How to Put an Eye Bolt Into Concrete
It's a common question in home repair forums and do it yourself message boards – a windstorm blows the fence down and breaks the fence posts off right at ground level. Often the posts were already weakened from rot, moisture and insect damage and old age and the wind was just the mercy blow that finished them off.

The homeowner is left with the challenge of coming up with a cheap and easy way to remove the broken-off fence post and they want to pull it straight out so they can sink the replacement post in the same location without digging too much.
11 Ways to Remove a Broken Fence Post
Many of the posts offer helpful suggestions for removing the broken posts and they can work in certain situations, here are 11 of the most useful:
- Dig a trench next to the footing and tip the post out.
- Wrap a chain around the post and use a high lift jack to pull the post out.
- Screw lag bolts through a chain into the broken off fence post and then use a vehicle winch/come along/high lift jack to pull the post out.
- Dig down a few inches and screw into the side of the post to pry it out with a lever and fulcrum.
- Screw a long eye-bolt into the post from the top and yank it out.
- Remove the wood from the concrete (using a drill bit or auger or chisel) and insert a new post.
- Chip away at the soil around the post with a steel bar and vacuum out the loose dirt with a shop vac.
- Use a post repair spur – drive it into the bottom of the old post and then fix the new post to it.
- Soak the ground with water overnight then pound the concrete further into the ground with a sledgehammer.
- Lift the post using a bumper jack or high lift farm jack.
- Just dig the post out by hand, or bring in heavy equipment like a tractor, bobcat or backhoe.
But these methods don't address the common situation facing a homeowner or do-it-yourselfer. Storm damage and high winds leave the fence knocked down with a broken post. Wood rot and insect damage leave nothing sturdy above ground. The concrete footing is of unknown size and depth. The damaged fence is close to buildings or utilities that restrict access by heavy equipment. (not even considering the rental expense or the damage they may cause to lawns).

Why Those Methods Fail
But to quote Mike Tyson "Everyone has a plan 'till they get punched in the mouth" each and every one of these ideas seems good until you go and do it and that fence posts punches you back. Then the homeowner realizes its not going to be so easy as it seemed:
- After digging down a few inches they discover the 4×4 posts are set in concrete below ground level.
- The post is rotten and the eye-bolt or lag screws pull loose, leaving the post and concrete plug in the ground.
- After long, hard work to chisel/drill the wood out of the concrete, the homeowner then discovers that getting the new wood post into the concrete is almost impossible. After cutting down the sides of the post to get it to fit in the concrete footing the post is wobbly and not secure.
- There is nothing secure to grab onto and the realization hits that the only way to get the post and concrete stump out is by digging a giant hole.
Many ideas are just not helpful:
- Just give up; you are not getting the post and concrete out.
- Use dynamite.
- Give your redneck brother a call and hook a cable to the post and his truck then put a 6 pack of Schlitz down the street and watch the fun.
- Put some termites on the post and wait 6 months.
- Pour diesel into the concrete footing and burn the post out.

But these methods don't address the common situation facing a homeowner or do-it-yourselfer. Storm damage and high winds leave the fence knocked down with a broken post. Wood rot and insect damage leave nothing sturdy above ground. The concrete footing is of unknown size and depth. The damaged fence is close to buildings or utilities that restrict access by heavy equipment. (not even considering the rental expense or the damage they may cause to lawns).
Using brute force to lift concrete is a bad idea. Concrete is extremely strong when compressed, but extremely weak when pulled. In fact, the tensile strength of concrete is only about 10% of its compressive strength. (properties of concrete reference). Forcing the concrete can cause dangerous flying chips as the concrete fractures and doesn't get it out of the ground.
Replacing a few posts on a fence requires the replacement posts to go into the same location. Cutting the old posts off below ground level and installing the new posts using an offset is simply not an option.
We encountered the same challenges and thought there had to be an easier, inexpensive way to remove fence posts and concrete footings from the ground, even if the post is broken off. We developed a method that makes it easy for two people to remove the posts by virtually eliminating the friction force between the post and the ground. It is just like lifting the weight of the post and concrete from a hole.
The Patented Wood Post Puller Method
Our Wood Post Puller method takes the work out of replacing fence posts set in concrete. The spike tool injects water at the base of the post and loosens the soil around the post. In a short time, the water forms a layer of mud around the concrete footing that helps slide the post out of the ground.
Ours is the only method that 'cuts' the post out of the ground. Water runs along the edge of the concrete footing and creates a mud layer that reduces the hold the ground has on the post.
Once loosened, use two pry bars to lift the post and concrete footing out of the ground. Leave the water running to automatically relieve suction force and help push the post out of the ground.
-

Connect your garden hose and insert the spike next to the footing -

Water loosens the soil and forms a mud layer -
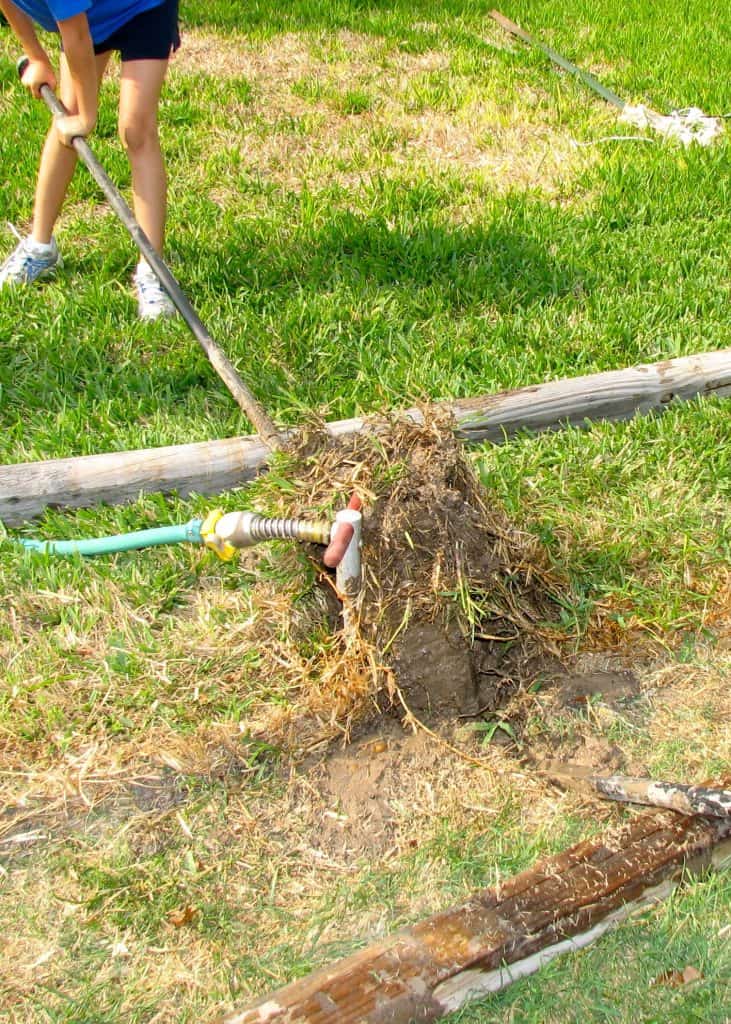
Water pressure pushes the post out from below -

Enjoy your success! Our 8-year-old daughter that manned the 2nd pry bar
The Wood Post Puller method works when the post is rotted or broken off. It even works when the concrete breaks up – simply keep injecting water around and underneath and remove concrete pieces by hand. This situation can get messy so use a hose-end shutoff to control the water flow.
The best spike tool to use is the RootIRRIGATOR from Corona Tools (buy now on Amazon)

Most homeowners want to repair their own privacy fence, using Wood Post Puller method makes it EASY. No digging required for many posts and it makes all lifting methods more effective.
- Do It Yourself Fence Repair
- For ALL Residential Posts
- Posts with Concrete Footings
- Wood or Metal Posts
- Broken or Rotten Posts
SLIDE the Post Out with WATER PRESSURE
PROVEN results, read our Testimonials!
Click here to learn more details and see full illustrated instructions for our patented Wood Post Puller method.
An Easy Method to Dig Out a Fence Post and Concrete Footing Using Hand Tools
When a post has to be fixed there is normally simply no other option than to clean out the present fence post and cement footing before you to put in the new one. Creating a plan of attack and then implementing the plan could make the difference between a 1-hour job and a long, difficult day of frustration.
Make Sure That Digging is the Best Way
To begin, judge the overall condition of the fence post and the cement footing. Solid posts offer a sizable advantage and will make removal far easier. Also, evaluate the cement base (if applicable) – is it still sturdy or is it damaged/deteriorating?
In the event that the post is cracked or the concrete base is deteriorated there might be no other solution than to dig out the fence post and concrete footing – but before deciding on difficult manual labor try the Wood Post Puller technique – it offers the advantage of working in synergy with all other leveraging and digging techniques. It greatly increases their capability and can smoothly remove fence posts and cement bases that stop alternative approaches. If you still you conclude there is no other way than to dig out the fence post, the following instructions will make this difficult undertaking as easy as possible:
How Far Down and How Big to Dig the Hole?
Dig a hole alongside the existing post and cement of roughly equal dimension as the post and concrete base – don't dig all the way around the fence post and don't dig a hole that is bigger than the post – you will only be doing excess work digging and then re-filling the hole after you are done.
Do you know how deep the post is buried? The following are normal starting dimensions before posts are put in the ground:
- 4 x 4 wood fence posts will commonly be 8 feet long put 3 feet in the ground
- Metal t-posts will commonly be 7 feet long put 2 feet in the ground
- Galvanized fence posts are generally 8 feet long put 3 feet in the ground
If you are not sure, you could also measure the height of the post that is above the ground (or the length of the section if it is broken off) and estimate the amount that is buried. Dig your hole at least 75% as deep as the fence post that is buried – for example, a typical wood post will be set in the ground 3 feet or 36 inches, so make the hole to a depth of at least 27 inches (36 x 0.75 = 27).
How to Dig the Hole
Start the hole using a round point shovel to get through any turf, roots, or other surface debris. As the hole becomes deeper, a trench shovel (also referred to as a ditch spade or trenching tool) can make the digging much easier until you are down to nearly 16-24 inches.
Using the shovel you are making use of your legs and your whole body weight to loosen the soil to be removed – keep going until the hole is too deep and confined and prevents you from getting leverage at the bottom of the hole. Dig as far as possible, then switch to equipment which is pushed by arm power – the fence post hole digger and digging spud.
Tip – Pick a post hole digger that is compact and light – unless of course you are a bodybuilder type. The large, brawny fence post hole diggers with the fiberglass handles will tire you out – the shorter, lighter fence post hole diggers with wood handles are more maneuverable and tend to be easier for most users, even if they compromise some reach.
Tip – Use a digging bar. The San Angelo bar was designed to make digging more efficient – it provides a chisel end to break up the dirt at the bottom of the hole and to trim the sides of the hole, the other tip of the bar is a point for splitting up difficult soil. Different kinds of excavating bars will include a packing tip for compacting loose dirt. Look for a bar that is high quality heat treated steel – don't waste your money to purchase a more expensive brand name.
After you have obtained the target depth, use the chisel end on the digging bar to clean out any dirt still in between the fence post and your hole. When you dig a round hole next to a round post foundation there will be a ridge that should be removed.
Extracting the Fence Post
As you begin the removal process, the essential idea is to push the post into the hole you just completed. Start by simply pushing the top of the post towards the hole, it should break free from the dirt and slide into the hole – after that, you can push the pry bars below the fence post and cement base and take it out.
If the fence post won't budge, attempt pushing the pry bar into the soil next to the fence post or concrete footing on the side opposite the opening and push it towards the hole. To maximize the force from the pry bar, use a leftover piece of 2 x 4 or similar wood on the ground to make a pivot and stop the pry bar from sinking in the ground.
If the post still is not going to budge, employ the digging bar to increase the hole around the circumference of the post footing. Go on prying the post out and enlarging the hole around the fence post until eventually it breaks free and moves over into the hole.
How to Set the New Fence Post
Don't use concrete footings when setting the replacement post. Concrete is simply not needed for most privacy fence installations – don't repeat the mistake! Dig a 10 inch diameter hole and set the post 1/3 of its length into the ground [set an 8ft post at least 2 ½ feet deep] so that it is below the frost line. Use a treated 4×4 fence post approved for direct burial and set the post with crushed gravel.
Not all fence posts are the same. Learn how to pick the right wood from the lumber yard to get the longest lasting fence.
Put 6 inches of of 3/4″ crushed gravel in the bottom of the hole before adding the posts. Put the post in the hole and start adding a mix of gravel and soil. Tamp the gravel firmly every 2-3 inches as you fill the hole and plumb the post. At the surface be sure to dome the soil so water runs away from the post for good drainage. Using this method, your fence should be straight and sturdy for many years.
-

3/4″ crushed gravel for setting wood posts -

Do not use rounded pea gravel
There are many discussions (arguments) on the internet about what causes posts to rot and if concrete footings should be used. Our experience shows that concrete footing are needed when setting posts in sandy locations. For other installations, concrete footing cause more trouble then they are worth.
We recommend crushed gravel to set residential privacy fence posts. When tamped, the crushed gravel will mix with the soil and 'lock' together to hold the post in the ground. The crushed gravel gives the same size of footing as concrete, with the benefit that you can dig thru the gravel if you need to remove or relocate a post.
Crushed gravel may also provide some benefit with improved drainage, but the main purpose is to provide the increased surface area to hold the post secure in the wind. Note that the sharp edges of crushed gravel are important, round pea gravel is not effective. Another advantage is with concrete you have to wait for it to cure, with tamped gravel you can build your fence immediately.
How to Put an Eye Bolt Into Concrete
Source: https://www.woodpostpuller.com/how-to-remove-a-4x4-fence-post-that-is-snapped-off-at-ground-level/
0 Response to "How to Put an Eye Bolt Into Concrete"
Post a Comment